 How to convert FLAC files to MP3 using Windows?
If you want to convert the FLAC files to MP3 to take with you on your iPod or MP3 player, this tutorial will walk you through the steps to do just that, using Microsoft Windows.
First things first, make sure you’ve downloaded and installed Winamp, the Flac with library support plug-in for Winamp, and iTunes, all of which are free.
There are two steps in converting your .flac files to .mp3. The first is to decode the .flac into .wav files. After that’s done, you’ll encode the .wav files into .mp3’s.
Decoding .flac files with Winamp
1 Open Winamp and select Options and then Preferences… (note: if you’re using the classic version skin, open the Winamp Preferences by clicking the Control and p keys on your keyboard).

2 Select Output from the Plug-ins section of the left window, and then select Nullsoft Disk Writer. Click Configure.

3 Click the Directory: button so you can choose a location to save the .wav files.

4 Navigate to the folder you want to save the .wav files in. You can save them in the same folder as the .flac files.

5 Click OK to return to the Preferences window, and then Close to return to Winamp. Now select File -> Play file… and navigate to the folder with your .flac files. Select all of the .flac files by single-clicking the first file, holding down the Shift key on your keyboard, and then single-clicking the last file. When all of the files are selected, click Open.

6 Press the Play button. Winamp will now decode the .flac files and turn them into .wav files. It typically takes about 20 seconds to convert a 5 minute song, but this depends on how fast your PC is.
Once Winamp is done decoding the files, make sure to set the Plug-ins -> Output back to DirectSound output, or the next time you try to play a file using Winamp, it will decode that file instead.
Check to make sure all of the .wav files are created.

Encoding .wav files with iTunes
1 First you need to make sure that iTunes will encode the songs to .mp3 (rather than the default, which is .aac). Start by selecting Edit and then Preferences….

2 On the General tab click the Import Settings… button.

3 Select MP3 Encoder from the Import Using: list, and then choose a quality from the Setting list. Click OK when you’re done.

4 Back in the main iTunes window, select File and then Add Folder to Library….

5 Navigate to the folder that you saved the .wav files in and select it. Click OK.

6 Find the newly imported .wav files in iTunes and select them all (single-click the first file, hold down the Shift key on your keyboard, and then single-click the last file). Right-click on any of the selected files and choose Create MP3 Version. You may want to get a cup of coffee right now, as this step will take a while (depending on the number of files you’re converting).

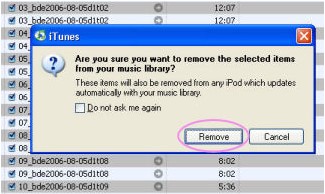
7 iTunes will let you know it’s done converting the files by playing a little “beep”. Now is also a good time to remove the .wav files from your iTunes library so you don’t confuse them with the (identical looking) mp3 files. With the .wav files still highlighted, click the Delete key on your keyboard. If prompted, click the Remove button.

That’s it, you’re done! Rename the files in iTunes (if you wish), give them a listen or transfer them to your iPod/mp3 player. Don’t forget to delete the .wav files if you no longer need them – they’re pretty big and take up quite a bit of space on your hard drive.
The .mp3 files can be found by going to My Documents -> My Music -> iTunes -> iTunes Music -> Artist Name -> Album Name.