 How to convert SVG to XAML and use it in Silverlight or WPF applications?
How to convert SVG vector files to XAML so that you can use them for your Silverlight or WPF (Windows Presentation Foundation) applications? Furthermore, how to edit SVG files in Expression Design and use them in Expression Blend? The instructions below will show you all these.
SVG (Scalable Vector Graphics) files are graphical vector files that are quite popular on internet. Wikipedia, for example, uses SVG for most of its schemes, charts, maps and graphical elements like that.
Expression Design – Microsoft’s vector drawing tool currently does not support import for SVG files. But, fortunately, there is a good workaround. This guide will show you how you can convert SVG files to XAML. Of course, XAML then can be used in Expression Design or Expression Blend and, therefore, in your WPF or Silverlight applications.
Step 1
Get the InkScape vector drawing tool. InkScape is Open Source tool with support for reading and editing SVG files.
Step 2
Start InkScape. Go to File then Open…. Find your SVG file and click on Open.

Step 3
Your selected file will open in InkScape and you can see it on artboard.

Step 4
Go to File and click on Save As…. Dialog shows and there you can select new file name. But now it is important to save your file in PDF (via Cairo) file format. So, pick that file format and then click on Save.

Step 5
New dialog opens asking you about more PDF details. Just accept the defaults but pay attention that there is a check-mark near option Convert text to paths.

Step 6
Now you have your SVG file saved as PDF. PDF is also type of vector format. Find your newly created PDF file and change its extension from PDF to AI (Adobe Illustrator file). You can do that by right-clicking on our file and in drop down menu go for Rename. Change .pdf with .ai and you are almost ready to go.

Step 7
With your AI file ready you can now start Expression Design. Go to File then New Document. In dialog that shows you can pick preset you want. Click on OK button.

Step 8
Now, you can go and import your previously created AI file into Expression Design. Go to File then Import. New dialog shows and there you can select your AI file. When you are done, click on Open.

Step 9
There you go. You now have your file in Expression Design ready to be modified or just exported into XAML file for you WPF or Silverlight apps.

Step 10
Take a look at Layers pane in Expression Design. You can notice that each and every element has been broken into paths and that you can select them one by one and change their properties.

You are not going to that now – you will just go on and see how you can use this imported image in WPF or Silverlight.
Step 11
First, select all objects you want to export. You can go and press CTRL+A to select all paths and elements. Once again, go to File but now pick Export command. New dialog shows.

Under Export Properties section you can see Format drop down list. There you can pick desired export format. For example, you can go and pick XAML Silverlight Canvas.
Under Text section mark the Paths option so that any text element can be converted to paths.
Enter the name in File name and pick the location for your file with Browse… button.
When you are done, click on Export All.
Step 12
You have come a long way from SVG to PDF/AI and now to XAML file. Now, when it is saved as XAML, you can start Expression Blend and use that XAML file.
Step 13
Create a new project in Blend and then right click on project file in Project pane. Click on Add Existing Item….

Step 14
From dialog, pick your XAML file – in this case it is zune_logo.xaml and click on Open.
Step 15
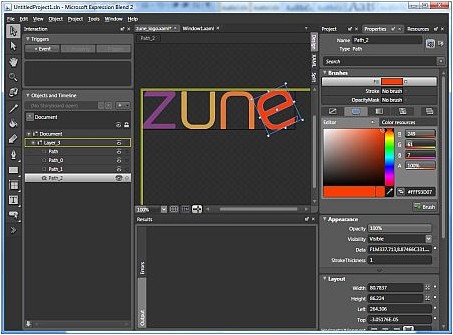
You can now see that zune_logo.xaml is part of your project. Double click on it to open it.

Step 16
Now, with zune_logo.xaml added to your project, you can use functions like Copy and Paste and add it to your interface. Also note that all original SVG formating is in place and that you can actually select elements and change their properties even trough Expression Blend.

So, just to sum up. First you need to find SVG file, open it in InkScape and save it as PDF file. Then you change it’s extension from PDF to AI. Now, open new document in Expression Design and import your AI file. Select elements you want to export to XAML and go to File then Export. Set name, location and file format (Silverlight XAML…). And now you can start Expression Blend and add newly created XAML file to your project.
Go on and start converting SVG files to XAML files and have fun!