 How to create an WMA Audio DVD using NeroExpress?
Nero Express is a new and innovative wizard based recording application based on the main application Nero. With the main essentials included such as data, audio, copy, and video, it will also work with the DVD-RW, and DVD+RW drives.
If you want to create an WMA Audio DVD, you can try NeroExpress to do it. Download NeroExpress HERE.
Step 1
Launch Nero Express, click All Programs, Nero, Nero OEM, NeroExpress.
Step 2
This will bring up the Nero Express main window. Click Music, WMA Disc.

Step 3
This will bring up the My WMA disc window, Click the Add button.
Step 4
This brings up the Select Files and Folders window. Highlight those WMA files to be added and click Add. Repeat this step till you have all the files you want added to the compilation.

Step 5
Once all the files have been added, click Finished in the picture above.
Step 6
This brings back the My WMA disc window. Click Next to move to the final step.

Step 7
Nero now shows the Final Burn Settings window. Nero needs some final configuration information prior to burning the Audio disc.
-
Select the recording device
-
Give the WMA disc a name
-
Set the Write Speed
-
Set number of copies
-
Verify data on disc after burn
Step 8
Click More for a drop down area with more added control of the write method used, see the picture below.
-
Write Method: If you have the option for Allow files to be added later enabled, this feature defaults to Track-At-Once mode.
-
Finalize Disc: Only select this feature if you do not plan on writing to the disc anymore. Used to close disc.
-
Determine maximum speed: The speed test determines how quickly the compiled files can be accessed. If the access speed is slower than the burning speed, the burning speed is reduced so as to avoid a buffer underrun.
-
Simulation: The simulation runs all the steps involved in burning a medium apart from activating the laser beam, so that you can assume that if the simulation is successful, the burning process will also be successful.
-
Write: This checkbox enables the actual physical burning process.

1 - Recording device field
2 - Disc name
3 - Write speed field
4 - Number of copies field
5 - Verify data checkbox
6 - More button
7 - Burn button
8 - Write Method field
9 - Determine maximum speed checkbox
10 - Simulation checkbox
11 - Write checkbox
Step 9
Selecting the Burn button brings up the a window requesting a blank DVD-R, DVD-RW, DVD+R, or DVD+RW media to be inserted in Recorder. Insert a blank disc and Nero will detect it and begin burning automatically.
Step 10
The Burning Process window is now shown on the PC. If any error messages are received during the write and/or the write fails, be sure to Save the Nero log file to the desktop. This file will have critical information about the system, as well as a very detailed description of the write process that was attempted. And it will provide exact error codes that will help the Technical Support team to trouble-shoot the issue. Without this file, we may not be able to properly assist in resolving the issues.
-
Used read buffer: This is an indicator of your temporary buffer level on your Hard Drive, being used by Nero during the burn.
-
Status: This is the progress bar of the actual write process.
-
Buffer Level: This is an indicator of your buffer level on the Recorder.

1 - Used read buffer
2 - Status
3 - Buffer Level
Step 11
If the write process was a success. Click Next to continue.
Step 12
This brings you to the completion of the Audio write process. Here you can choose to Burn the same project again; start a New project; launch the Cover Designer to create a label; Save project;or Exit the Nero Express program.

1 - Burn the same project again
2 - New project
3 - Cover Designer
4 - Save project
5 - Exit button
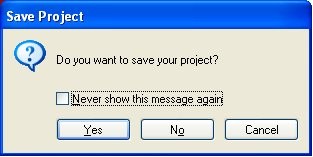
Step 13
If you select the Exit option, you will get the window as shown below, asking if you wish to save your project? Only select Yes if you plan on doing this exact same write operation in the future, as this will create an NRI image file that will allow you to do this same write operation without needing to select the format, the files, the write method, etc. It will do the exact same write operation without any input needed from you. In most cases, select No for this window.
