 How to Open APE Files ?
You might be puzzled at first if you encounter an audio file with the ape extension for the first time. Trying to play it in Winamp, Windows Media Player and XMPlay will not be successful, in fact, the song will not be loaded at all. The Ape file format is a lossless compression format of the compressor Monkey’s Audio.
All three do not support ape files by default which means that we have to use plugins to add the support to the players. Lets start.
Easiest Method -- Foobar 2000 + Plugin
Possibly the easiest method to getting APE files to play fast is to install the Foobar 2000 application and also install a plugin for it that allows for APE playback. Foobar does not support Monkey's Audio out of the box but it has an official plugin (as it has for many other formats as well) and combined it makes an easier method than anything else.

Download Foobar 2000 from AfterDawn
Install APE Plugin for Foobar 2000
The installation of APE plugin for Foobar 2000 is manual, but it could not be any easier. Simply go to your C:\ (Start Menu --> My Computer (Computer in Vista), C:) and go to your Program Files folder. Open the Foobar 2000 folder and then open the Components folder and you will see a bunch of DLL files. Now click here to download the Monkey's Audio plug-in and open it in WinRAR as shown in the picture below.

Download WinRAR from here.
Extract DLL file to Component Folder
With the Component folder still open, simply click and drag foo_input_monkey.dll from WinRAR into the folder as shown in the picture to the right (click to enlarge if you need to).
Now, if you already have Foobar 2000 running, close it and restart the application. This time it should play the APE files you want to play without a problem.

Play in DirectShow players such as Windows Media Player
It is totally possible to play APE files in Windows Media Player and technically any DirectShow-based player. Before we look at Windows Media Player directly, let's take a look at Media Player Classic because with Windows Media Player we will also need to install a plug-in to read the APE metadata correctly.
The first thing we need is a DirectShow filter, and there is a perfectly good one available called Radlight APE DirectShow filter.
Download it from:
Download Media Player Classic from:
http://www.afterdawn.com/software/video_software/video_players/media_player_classic.cfm

Install RadLight APE DirectShow Filter
When you download the RadLight APE DirectShow Filter, run the installer. It is a simple installer, tick the box immediately to accept the agreements and click Next until it is finished.
This will install the files necessary to make APE files work in DirectShow-based players, which include Media Player Classic and Windows Media Player. Test out an APE file.
There is one more step to perform however. Windows Media Player cannot directly support the Monkey's Audio metadata (information on the tracks) and so the WMP Tag Support Extender must be installed.

Install WMP Tag Support Extender
When you have downloaded WMP Tag Support Extender, run the installer. It is just a basic install and requires you to just clicking Next until it is complete, at which time, you can click Close.
Now we must configure Windows Media Player to use this add-on.

WMP Tag Support Extender - 1
Open Windows Media Player. If you do not have the latest Windows Media Player, this might not work.
Download Windows Media Player by clicking here.
Now open Windows Media Player and you should see something similar to the picture located to the right of this text (clicking will enlarge). Right-click somewhere on the top bar (I have right-clicked beside the Now Playing button) and scroll your pointer down to Tools --> Plug-ins --> WMPTagSupportExtender Plugin. This usually is already selected.

Make sure that there is a tick beside this plug-in or else Windows Media Player won't use it while playing APE audio. Now there is another bit of configuring to do. Again, right click in the same spot, navigate to Tools --> Plug-ins --> Options and left-click on Options. This will open Windows Media Player Options in the Plug-in tab.
WMP Tag Support Extender - 2
In the Plug-in tab in options you will see a list underneath Category. As you can see in my picture (click to enlarge) you need to click Background. Now from the list that appears on the right, click on WMPTagSupportExtender (don't untick the box, click the text) and then move the mouse below to the Properties button and click it. This will now open a new window.

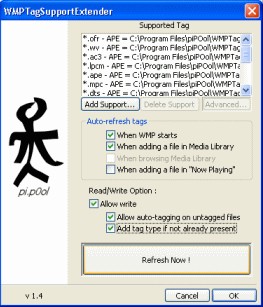
WMP Tag Support Extender - 3
Now as you can see in my picture (click to enlarge), a new Window will pop-up with settings for WMP Tag Support Extender. From here you can change some of the Read/Write options for tags. I recommend selecting "Allow Write" and then selecting both the options available to you below it.
Once you are done, click "Refresh Now" to refresh your library, then click OK. This should now work.
Note: We have had trouble getting tags to work with the latest version of Windows Media Player 11, even trying the register DLL workaround. Hopefully an update will fix this.
