 How to convert other audio and video files to FLV files?
FLV is a Flash Live Video file. It is a format that is designed for web playback, offering high rates of compression. Because of the tiny size, fast loading files, this makes it possible to watch the video files over the network. Currently almost all the online video sites are using this video format. Such as YouTube, Hulu, Google Video, MySpace, etc. We can say FLV has become the mainstream of video file format. To convert other audio and video files to FLV files, you can try the following two ways.
Create FLV files using Goodok FLV Converter
Step 1-Run software
Run Goodok FLV Converter after downloading and installing this software. The main interface will pop up.

Step 2-Add video files
Click Add File button to input video files.
Step 3-Set the output settings
In Output Media Format box, you can choose the Flash Video File, namely, FLV as the output format. In right box, choose the option Quality and you can configure video and audio parameters like video size, video quality, frame rate and so on to get better video quality. Choose Output Settings, it is easy to specify the output path where you can find the exported FLV files.

Step 4-Convert
Click Convert button to start encoding.

After encoding is finished, the output FLV folder will pop up automatically, and then you can enjory it.
Create FLV files using Flash Video MX
Please download the program at Once it is downloaded, launch it and the window below is its main interface:

Step1. Input the video
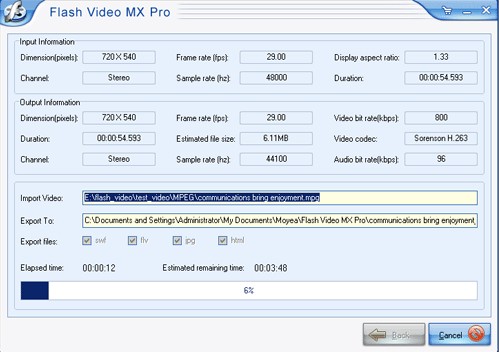
Click the Folder and input the video in. Actually, this converter supports to convert videos in various formats like AVI, MPEG, MP3, WMV, MOV, ASF, etc. Have the video trimmed with dragging the slide bars of Start Time and Finishing Time for the exact video clip. Just do it under relative tabs. Click Next to continue.
Step2. Parameter settings
Set the video and audio parameters for the target Flash to fit your needs, such as size, frame rate, bit rate, audio channel, audio sample rate, etc.
Step3. Output Settings
a. Export settings.
Tips: Do check the boxes of “Generate FLV file”, “Generate HTML file”, if you want an HTML file.

b. Player settings
This is the most amazing! Preview in a What-you-see-is-what-you-get way.

Three parts here for the above image, Left: Control Bar, Middle: Detail settings, Right: instructions for each item in the middle.
Left: Control bar: Up to 17 attractive control bar skins
Middle: Detail settings & Right: instructions for each item in the middle.
1 Player position, Panel color, Hide button, big play button, Reply setting, pause frame, scale, are to let you be a movie maker.
2 video link URL, video end URL automatic accessing, load mode, player extend, Play URL, etc will help a lot for HTML file.
3 Clear instructions for each item you go in the middle.

Step4. Conversion
Click Start and seconds later (the conversion speed is fast yet depending on the file size, the larger, the longer), you will get your FLV file in your folder. To stream the video online, you can upload all generated files to the same folder on your server.