 How to use Magic ISO Maker to deal with ISO files?
MagicISO is a powerful CD/DVD image file creating/editing/extracting tool. It can open / create / edit /extract CD/DVD image files, and it can convert bin to iso and back. as well as make ISO file from DVD/CD-ROM or hard disk, and handle bootable information at meanwhile. You can do the following things to ISO file with the help of MagicISO.
Quickly create an new ISO file or an new CD/DVD
Step 1
Click menu Files ->New to choose which type of ISO image you want to create.

Data CD/DVD image: The new ISO image contains two file systems - ISO 9660 and Joliet. This ISO image or CD/DVD burnt with this ISO image can be read on Microsoft Windows.
Bootable CD/DVD image: Create a bootable ISO image with choosing bootable image file that can be get from bootable floppy disk or another bootable ISO image. The new ISO image contains two file systems - ISO 9660 and Joliet. This ISO image or CD/DVD burnt with this ISO image can be read on Microsoft Windows.
UDF CD/DVD image: Create UDF-ONLY ISO image.
Hybrid CD/DVD image: The new ISO image contains four file systems - ISO 9660, Joliet, UDF and Apple HFS+. The ISO image or CD/DVD burnt with this ISO image can be read on Microsoft Windows and Mac OS X.
Unix/Linux CD/DVD image: The new ISO image contains three files systems - ISO 9660, Joliet and RockRidge. The ISO image or CD/DVD burnt with this ISO image can be read on Microsoft Windows ,Linux and Unix.
Step 2
Dragging files or directories from Local Browser into ISO Panel. or click the button  to add files or directories.

Step 3
Click  to create an new folder. Then enter the folder name.

Step 4
Click  to delete files or folders.
Step 5
Press F2 or click  to rename file name, folder name or volume name.
For creating an new ISO image.
Step 6
Click  to save in ISO image.

For creating an new CD or DVD.
Step 7
Click  to burn CD/DVD on-the-fly.

Step 8
Choose your CD/DVD recorder, Choose write speed. Important: you must remember to clear the Finalize CD checkbox if you need to write data onto this CD or DVD later. With a Multisession CD or DVD, this checkbox is only checked for the last session of the CD or DVD. This setting write protects the CD or DVD and no further writing is possible.
Step 9
Click Burn it! button to start the burn process.
Using MagicISO to edit ISO file
Step 1
Click  to open ISO file or choose File menu and Click Open Command.
Step 2
Dragging files or directories from Local Browser into ISO Panel. or click the button  to add files or directories.
Step 3
Click  to create an new folder. Then enter the folder name.
Step 4
Click  to delete files or folders.
Step 5
Press F2 or click  to rename file name, folder name or volume name.
Step 6
Click  to save in ISO image.

For creating an new CD.
Step 7
Click  to burn CD/DVD on-the-fly.

Step 8
Choose your CD/DVD recorder, Choose write speed. Important: you must remember to clear the "Finalize CD" checkbox if you need to write data onto this CD or DVD later. With a Multisession CD or DVD, this checkbox is only checked for the last session of the CD or DVD. This setting write protects the CD or DVD and no further writing is possible.
Step 9
Click Burn it! button to start the burn process.
Make ISO from CD/DVD-ROM
Step 1
Click Menu Tools->Make ISO from CD/DVD-ROM.

Step 2
Choose Source CD/DVD-ROM.

Step 3
Enter output file name.
Step 4
Choose output format for your CD/DVD.

Standard ISO image file (.ISO): It is used for All kind of DVD Disc and Data CD with single track.
BIN image file (.BIN/.CUE): It is used for Audio CD, Video CD, Super Video CD and all CD with single session.
NRG image file (.NRG): It is used for All kind of CD (include Audio CD, Video CD, Super Video CD and Data CD etc.)
*Universal Image Format ( .UIF): It is used for all kind of CD and DVD.
It is strongly recommended for backuping your CD or DVD.
Step 5
If you choose Universal Image Format(*.UIF) as output format, you can enter password for protecting your image file.
Step 6
Click Ok to process.
Extract boot image from CD/DVD-ROM
Step 1
Click Menu Tools->Make ISO from CD/DVD-ROM.

Step 2
Choose Source CD/DVD-ROM.

Step 3
Enter output file name.
Step 4
Check Export Boot Image.
Step 5
Click Ok button to process.
Convert CD/DVD image
Step 1
Click menu Tools->Convert ....

Step 2
Enter source file name. Choose output format. Enter output file.

Step 3
Click Convert.
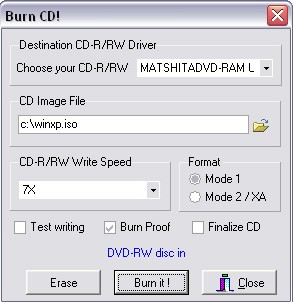
Burn CD/DVD with CD/DVD image file
Step 1
Click  to open Burn CD! Dialog.

Step 2
Choose CD/DVD-Writer.
Step 3
Enter CD/DVD image filename.
Step 4
Choose writing speed.
Step 5
Click Burn it!.